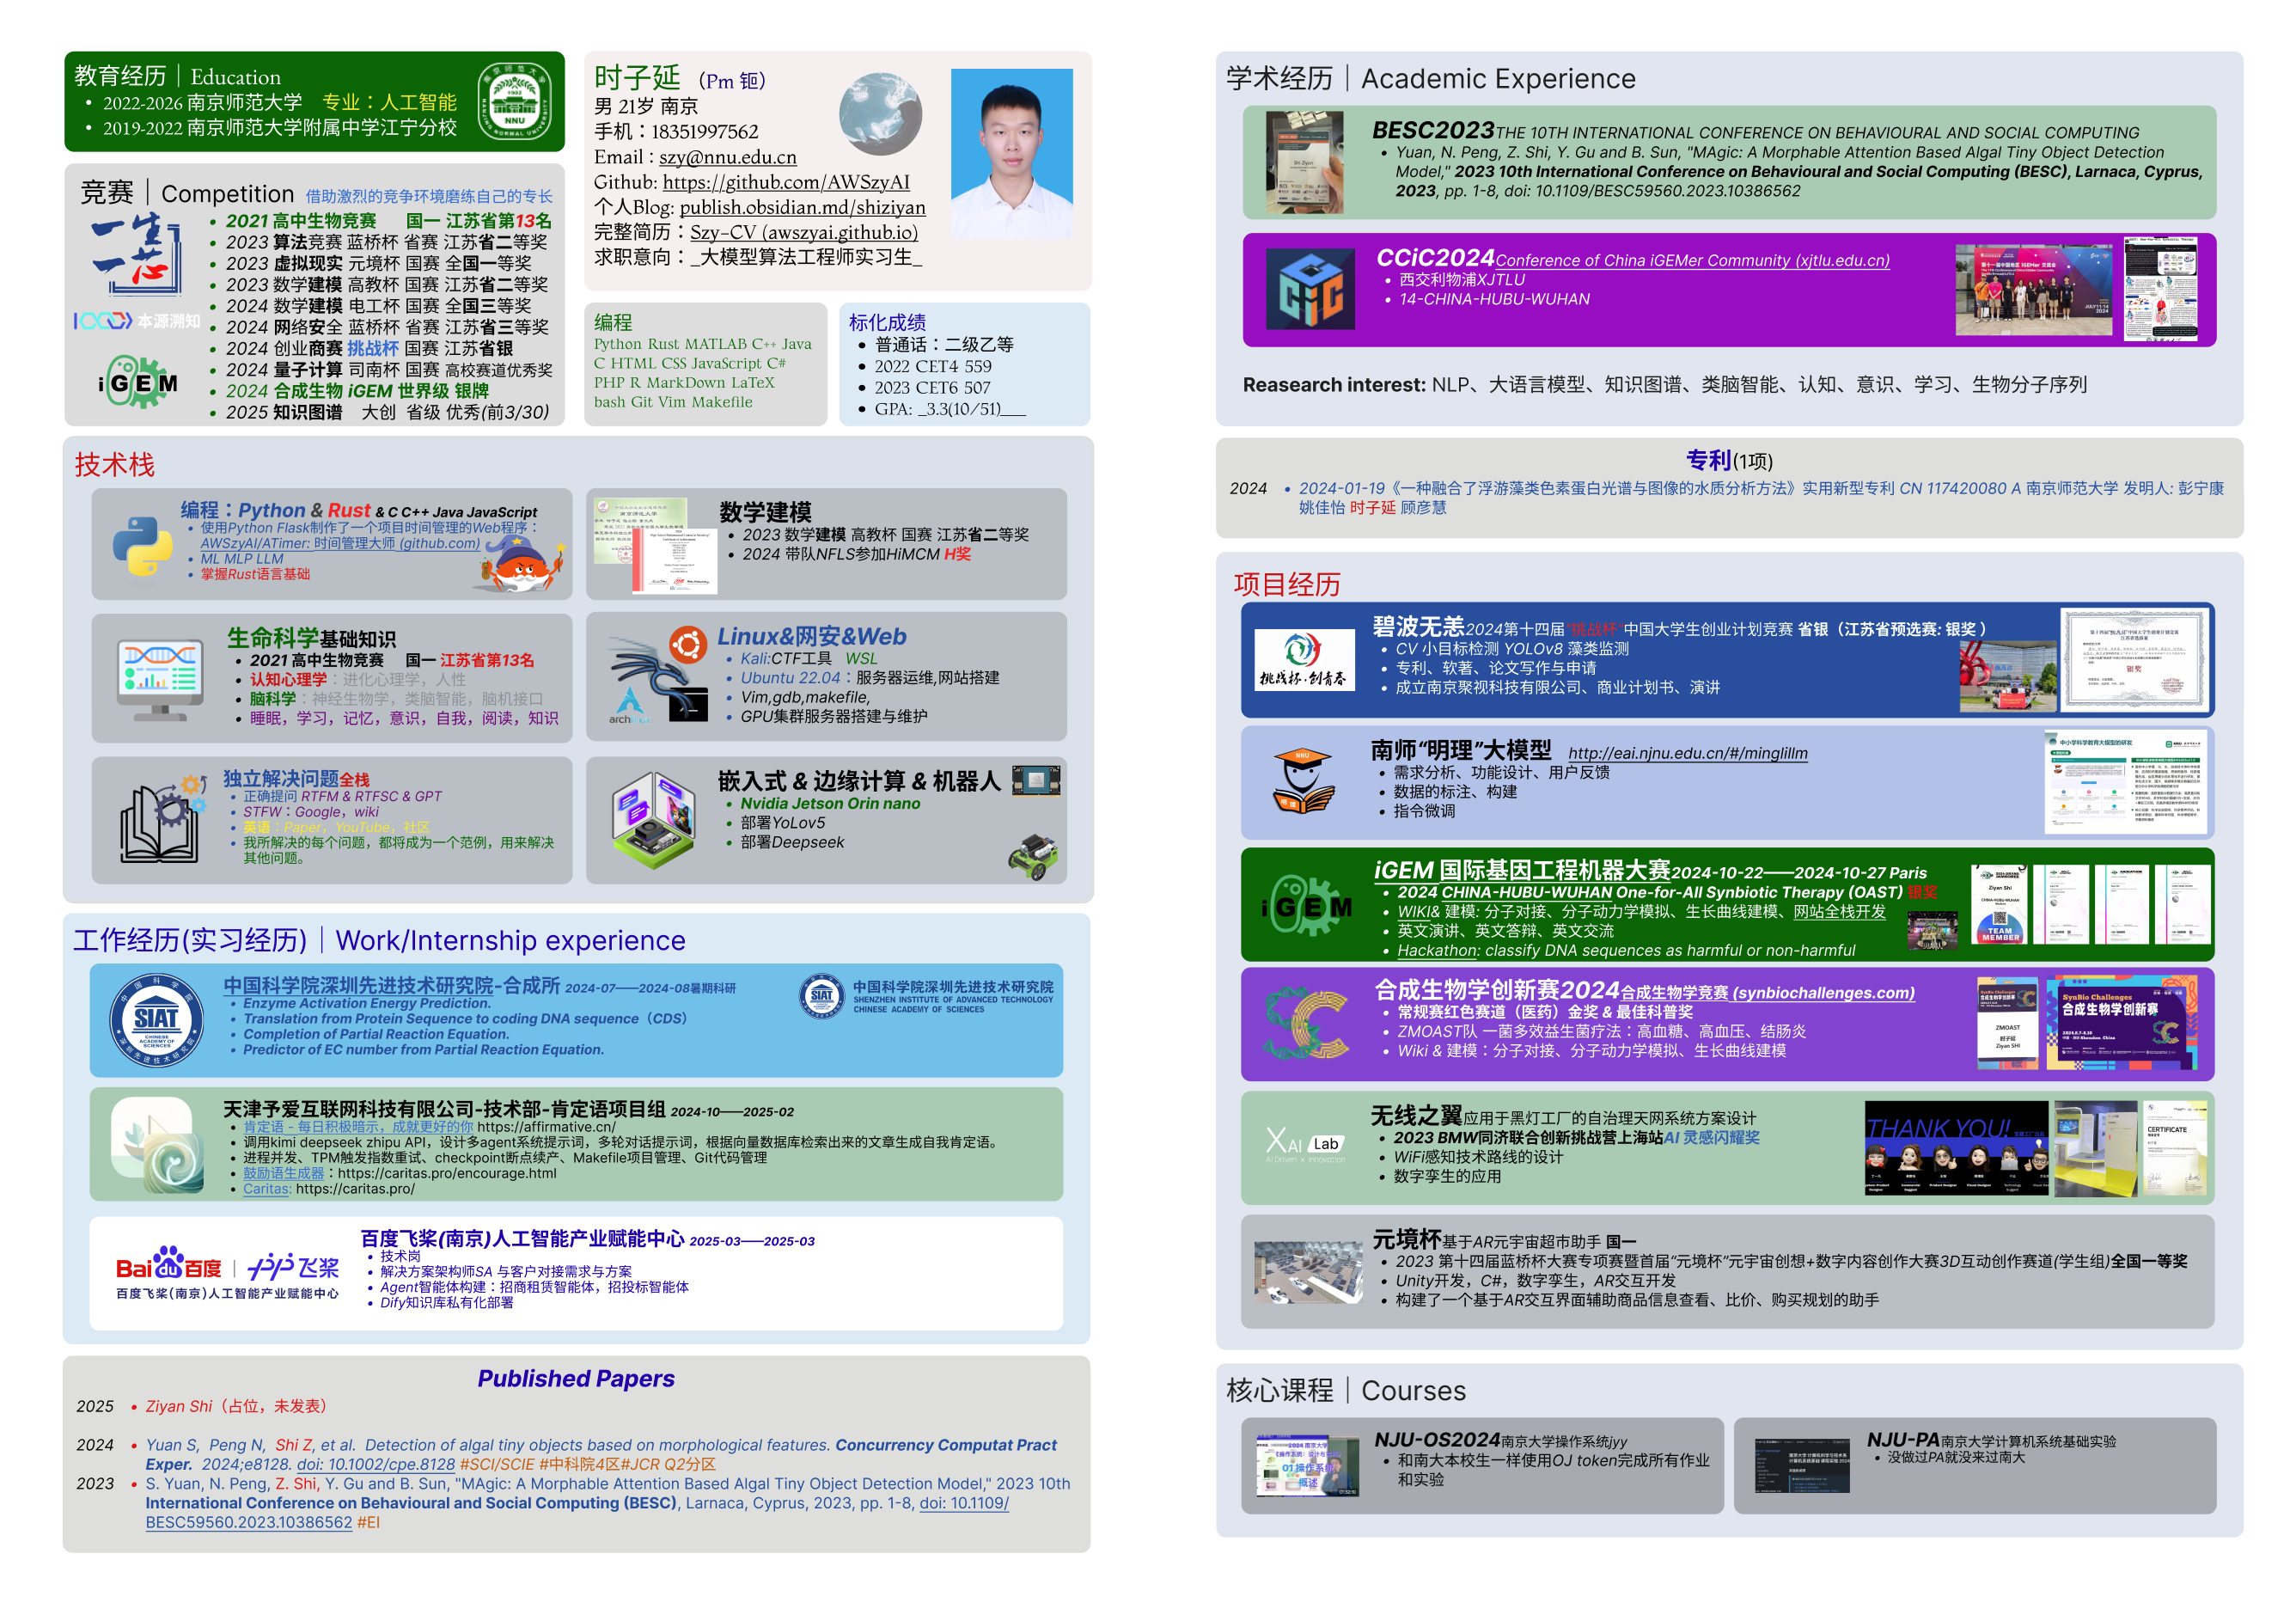
浮躁

浮躁的本质是对立刻满足的欲望。

这欲望会催生出对“通过捷径达成目标”的幻想,俗称侥幸心理。被这幻想蒙蔽的人意识不到有些阶段就是无法跨越、不可跨越、不应该被跨越的。

浮躁的人对现状不满、急于摆脱现状。这种想法是积极的,但是思想上太急了,行动上就会变形。导致他们不接受显示、情绪波动、浪费精力与实践,并且频频犯错,难以进步。他们很可能意识不到这几个事实:

  1. 资源是稀缺的
  2. 只要做事就一定会出问题
  3. 人都会死
  4. 意外
  5. 运气

他们想要世界立刻满足他们,希望“对未知的恐惧”立刻消失,导致钻牛角尖的行为——想要“马上解决当时不可能解决的问题”。

他们会因为觉得“学习没用”而拒绝学习,实则是“稍微一学就要有用就要满足我,解决我的需求”的欲望在作祟,使得他们坚持不到学习开始有用的时候。单次劳动确实比单次编程省事省时间,但是多次劳动比单次编程多次重复利用要低效得多。

因此,浮躁的人往往表现得很勤奋,实则很懒。他们恐惧失败,便会陷入“不求有功,但求无过”的平庸;他们被欲望蒙蔽以至于看不清自己,导致没有能力制定对自己来说合理可行的计划,最终常常只做计划而不行动;他们回避困难,因此常常拖延,他们做不到“迅速做完简单的部分,把节约出来的实践放在困难部分的处理上”,而是“用几乎全部时间处理简单的部分,至于困难的部分,干脆’掩耳盗铃‘,视而不见,暗地里希望困难自动消失”。

Ubuntu莫名崩了,重配环境。行云流水两个半小时做了以下几件事

  1. 官网下载Ubuntu22.04.4 ISO镜像文件
  2. 在垃圾Windows上的盗版VMware Workstatiohn Pro 16上安装Ubuntu22.04 4G+64G 2核4线程

    1. 念头 游戏本安装Ubuntu物理机而非虚拟机
    2. 念头 摒弃Windows
    3. 念头 寻找质量最高的VMware or 替代产品(UTM?)
    4. 念头 数据云备份(github)
  3. 使用DiskGenius恢复原来虚拟机中的关键文件,整理文件 #数据恢复 #数据备份 #数据安全

    1. 念头 整理文件,备份文件
    2. 疑惑 PA必须要有图形界面,OS呢?
    3. 念头 用WSL暂时替代虚拟机
  4. Install Vim: sudo apt install vim
  5. Install fish:sudo apt install fish,chsh -s /usr/bin/fish
  6. 编译安装NPC//release中下载的二进制文件有段错误,是我的系统的问题?

    1. clone

      1. sudo apt install git
      2. git clone https://github.com/ehang-io/nps.git
    2. 安装go,编译安装

      1. sudo apt install golang
      2. go build cmd/npc/npc.go
    3. edit start.sh & npc.service
    4. sudo systemctl daemon-reload
    5. sudo systemctl enable npc
    6. sudo systemctl start npc
    7. sudo systemctl status npc
  7. 安装code-server

    1. sudo apt install curl
    2. curl -fsSL https://code-server.dev/install.sh | sh
    3. sudo systemctl enable --now code-server@$USER
    4. config: vim ~/.conf/code-server/conf.yaml

      • password
      • 127.0.0.1:7071
    5. restart sudo systemctl restart code-server@$USER
    6. stop: systemctl --user stop code-server
  8. 安装VScode

    1. Download from https://code.visualstudio.com/docs/setup/linux
    2. sudo apt install ./code_1.87.2-1709912201_amd64.deb
  9. Install SSH:

    1. sudo apt update && sudo apt upgrade
    2. sudo apt install openssh-server
    3. remove the key before ssh-keygen -R [<IP>]:<Port>
  10. 配置防火墙

    1. sudo ufw enable
    2. sudo ufw allow 22

      1. 22
      2. 8024
      3. 7071
  11. 配置ssh免密登录

    1. ssh-keygen -t rsa -b 4096 -C "your_email@example.com"
    2. ssh-copy-id -i ~/.ssh/id_rsa.pub <Username>@<IP>
    3. mkdir ~/.ssh/
    4. echo "your_public_key" >> ~/.ssh/authorized_keys && chmod 600 ~/.ssh/authorized_keys
    5. sudo service sshd restart
  12. add ssh keys to github

    1. ssh-keygen -t rsa -b 4096 -C "szy@nnu.edu.cn"
    2. git config --global user.email "szy@nnu.edu.cn"
    3. git config --global user.name "Ziyan Shi"
  13. git clone codes
  14. sudo apt install make
  15. Install PA Env

    1. sudo apt-get install build-essential
    2. sudo apt-get install gcc-doc
    3. sudo apt-get install libreadline-dev
    4. sudo apt-get install libsdl2-dev
    5. sudo apt-get install llvm llvm-dev
    6. sudo apt-get install gcc-multilib
    7. wget https://apt.llvm.org/llvm.sh && chmod +x llvm.sh && sudo ./llvm.sh 15

醒来再更,碎觉。

Github: https://github.com/AWSzyAI/tgroq

Terminal Groq

This repository is forked from https://github.com/tomwarias/Terminal-Groq-Chat 该贡献者提出了一种在命令行调用Groq的API展开多轮对话的prompt界面,就像这样:

>>> User: 
<<< Jarvis: 

运行Terminal-Groq-Chat的代码需要在其项目目录下使用python3 groq.py命令,而无法随时随地使用tgroq运行,也不能像这样tgroq "My Question is..."

However, 我做了以下改进:

  1. rename groq.pytgroq 以避免import groq和自身文件名的冲突
  2. 修改代码使得可以直接将问题作为参数以运行tgroq "My Question is..."
  3. 编辑了tgroq.sh并添加到环境变量以随时随地调用tgroq呼出
  4. 保留了多轮对话机制。当无参调用tgroq时,开始多轮对话,当使用tgroq "My Question is..."时,直接将回答输出到终端

Installation Steps

  1. Clone the Repository

    git clone https://github.com/AWSzyAI/tgroq.git
  2. Install Dependencies

    Set API key, you can found it here https://console.groq.com/keys:

    set GROQ_API_KEY=<your_api> 
  3. Install Dependencies

    Install the necessary Python packages by running:

    pip install groq, asyncio
  4. add tgroq to PATH

    chmod +x init.sh
    sudo ./init.sh /usr/local/bin/
  5. Run the Application

    Start the code with:

    tgroq
    tgroq "Your question"